Quickstart
Getting GISNIX onto a machine is a short journey: you write the installer to a USB stick, boot from it, connect to the network, answer a few questions, and reboot into a working system. This page walks the whole way, from the stick to the moment you have GISNIX's commands at your fingertips.
Here is the shape of it before we begin.
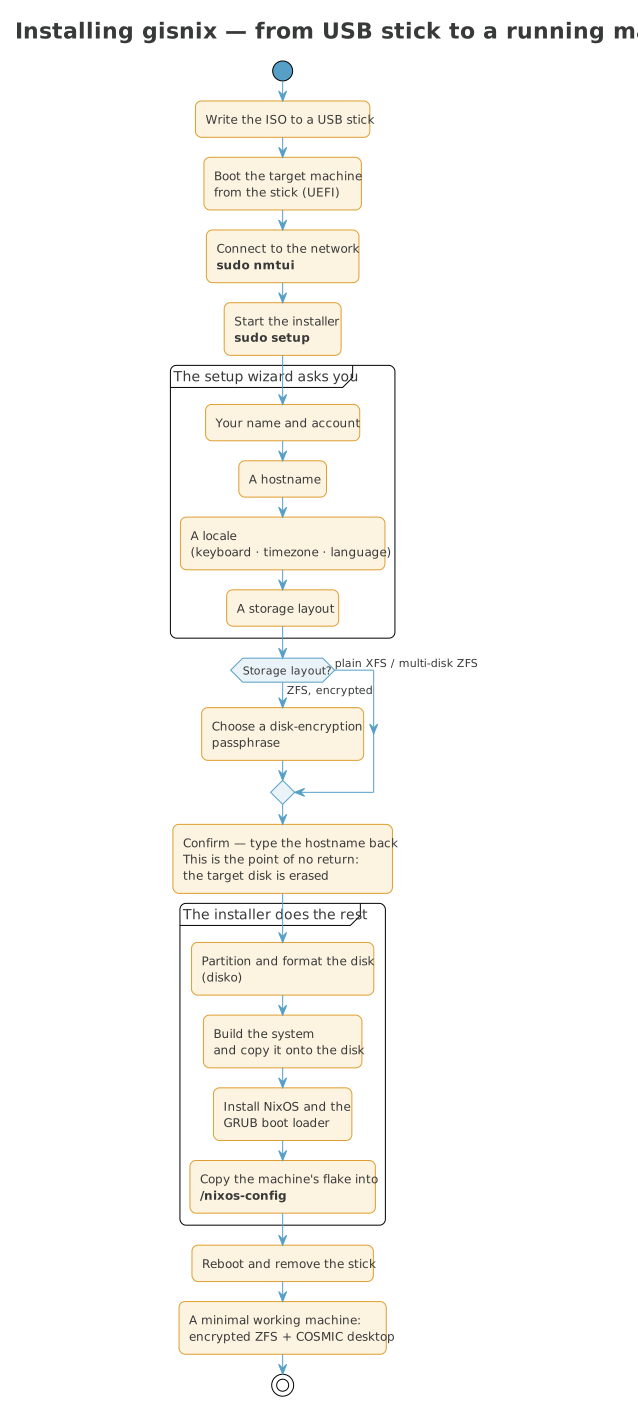
Installing GISNIX erases the target disk
The installation completely wipes the disk you install onto. Every existing partition, operating system and file on it is destroyed, and the data cannot be recovered afterwards. Back up anything you care about before you start, and be certain you have chosen the right disk. GISNIX and Kartoza accept no responsibility for lost data — you install at your own risk.
1. Get the installer
Download the ready-made image from the latest release, or, if you already run Nix, build it yourself:
git clone https://github.com/kartoza/gisnix
cd gisnix
nix build .#nixosConfigurations.installer.config.system.build.isoImage
Either way you end up with a .iso file — the installer.
2. Write it to a USB stick
Copy the ISO onto a USB stick. If you have not done this before, making a bootable USB stick shows you how on Windows, macOS and Linux. The stick becomes the installer you boot from; its own contents are replaced, so use one you can spare.
Want to try the whole thing without any hardware first? nix run
.#test-install builds the installer and boots it in a virtual machine with
a throwaway disk, so you can rehearse the steps below safely.
3. Boot from the stick
Start the target machine from the USB stick. Most machines have a key you hold at power-on to choose the boot device (often F12, F10 or Esc); on some you set the boot order in the firmware settings. GISNIX needs UEFI boot with Secure Boot turned off.
You arrive at a plain text screen, logged in and ready. Nothing has been written to the machine's disk yet.
4. Connect to the network
The installer builds your system from packages it downloads, so it needs a working internet connection. If you are on a cable, you may already be online. For wireless, open the network chooser:
Pick Activate a connection, choose your network, and enter its password.
When you leave nmtui you should have a connection. (A wired connection
usually needs nothing at all.)
No network? Tether an iPhone over USB
If the only internet you have is your phone, an iPhone will do. Plug it
into the machine with a cable and turn on Personal Hotspot on the
phone. The installer already runs the pairing service that makes this
work, so the phone shows up as a wired connection — tap Trust on the
phone when it asks, then activate that connection in nmtui. Nothing to
install or configure; it works on the installer and on the machine you go
on to install. See Supported hardware.
5. Run the installer
Now start the setup wizard:
It asks you a handful of questions, one screen at a time:
- Your account — your name, a username and a password. You can also have it fetch your SSH public keys from your GitHub username, so you can log in remotely from the first boot.
- A name for the machine — its hostname.
- A locale — your keyboard layout, timezone and language, chosen together as one preset.
- How to lay out the disk — the recommended choice is ZFS on a single disk with encryption, which asks you for a passphrase. (Plain disks and multi-disk layouts are offered too; see Storage modes.)
Point of no return
The next step erases the disk you selected. There is no undo. Make sure you picked the right disk and that anything important on it is backed up elsewhere.
When you have answered everything, the wizard asks you to type the hostname back to confirm. This is the point of no return: from here the disk is erased and the install proceeds on its own — it partitions the disk, builds your system, installs it, and leaves a copy of the machine's description in your home directory. There is nothing more to do but wait.
See it first, safely
setup --mock runs the whole wizard without touching a disk or the
network — useful for a dry run before you commit.
6. Reboot into your new machine
Remove the USB stick and restart. If you chose encryption, the machine asks for your passphrase as it starts. Then you are looking at a login screen.
What you have now is a minimal but complete GISNIX machine: an encrypted ZFS disk and the COSMIC desktop, ready to grow into whatever you need.
7. Your first login
Log in with the account you created, and the COSMIC desktop appears. From here, everything you do to the machine runs through one command — and this is how you reach it.
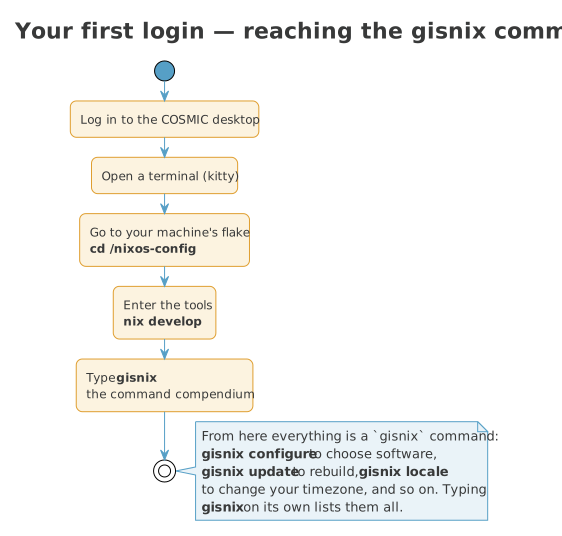
Open a terminal — GISNIX uses kitty, which you will find in the applications menu. In it, go to your machine's description and step into GISNIX's tools:
The first nix develop takes a moment while it fetches those tools. When
it finishes, type:
and you are looking at the command compendium — the full list of things
GISNIX can do for this machine. gisnix configure opens a menu of software
to add; gisnix update rebuilds after a change; gisnix locale moves your
clock when you travel. Typing gisnix on its own always shows the list.
Onto the latest desktop
The desktop you just booted was installed from a fully-cached stable
build so the install was quick. Your first gisnix update, once you are
online, moves the machine onto the same up-to-the-minute COSMIC every
other GISNIX host tracks. It may take a little longer than a routine
update, but only this once.
What's next?
- After the install — where your machine is described, how to pull GISNIX updates, and pinning versus tracking the latest.
- Understanding GISNIX — the ideas behind what you just installed.
- Software bundles — choosing what your machine has.
- Building your fleet — going from one machine to many.